


Product Description
-
Micro-spray starter landscaper kit to water up to 250-sq ft of landscapes, gardens, shrubs, trees and more
-
Kit includes a product guide, showing the benefits and uses of a Mister Landscaper low-volume irrigation system
-
Includes hose fittings to attach 1/2-in poly tubing to your outdoor water faucet
-
50-Ft of 1/2-in poly tubing to run through landscapes to supply water to 5 green stake assemblies
-
5 Green stake assemblies each complete with 10 GPH flow controller, 27-in flexible green vinyl, 13-in green stake, on/off valve to adjust spray distance, vinyl locking collar and a 3-in-1, half circle 4-ft radius spray pattern
-
Kit includes 8 additional spray patterns with the 6 extra micro-sprays and 1 being the 3-in-1 micro spray
-
With the enclosed 1/2-in coupling, you can expand this kit by adding up to 250-ft more of the 1/2-in poly tubing and 30 stake assemblies
-
All contents of this kit proudly made in the USA
Features |
|||
|---|---|---|---|
|
Backflow Preventer
|
No
|
Pressure Regulator Included
|
No
|
|
Color/Finish Family
|
Green
|
Timer Included
|
No
|
|
Filter Included
|
No
|
Tubing Included
|
Yes
|
|
Fittings Included
|
Yes
|
Tubing Stakes Included
|
Yes
|
|
Installation Guide Included
|
Yes
|
Type
|
Drip irrigation landscape kit
|
|
Package Contents
|
Backflow valve, 1/2-in poly faucet fitting, 50-ft roll 1/2-in poly tubing, 1/2-in tee fitting, 1/2-in coupling, hole punch tool, 4 goof plugs, 5 complete green stake assemblies with half circle micro sprays, 2 end crimpers and 6 additional micro sprays
|
|
|

Water Conserving

High-Quality, Commercial-Grade

Easy Connection

Easy Installation

Excellent Coverage

The Ideal Irrigation Solution

Spray Pattern Selection

Reusable Locking Collars

Easily Maintained & Winterized

A Flexible System

An Expandable System
Quick Installation Guide

Parts: 1/2-in Poly Faucet Fitting, 1/2-in Poly Tubing
After threading the Hose Fitting onto the Faucet or existing back flow, push the 1/2-in Poly Tubing onto the Poly Faucet Fitting and over the built-in O-ring. Hand-tighten the Locking Collar.
Anatomy of a Stake Assembly

Micro Sprays

Swap Tops: How To Change Patterns

Remove
Remove the Swap Top from the G-shaped Micro Spray.
Increase Your Product Knowledge Base

System Design Help
This PDF contains basic information that will help you get started with system planning.PDF, 185 KB
Locking Collars
This PDF gives you a break down of how a locking collar connection should be made for a lasting, watertight seal.PDF, 1017 KB, 2 pages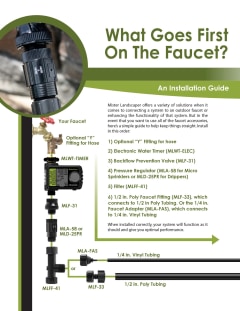
What Goes First
This PDF explains the order in which Mister Landscaper products should be connected to an outdoor faucet. Some products mentioned are not included in this kit but can be purchased separately and used with this kit.PDF, 556 KB, 2 pages


Drip Irrigation Buying Guide


About Drip Irrigation
Micro Sprinklers


Drippers


Pot Stakes / Adjustable Drippers / Dripper Stakes

Benefits of Drip Irrigation

How To Get Started


Converting PVC to Drip


Drip Irrigation Components

Operation and Maintenance


Maximum Runs and System Restrictions


Drippers: 25 PSI
Adjustable Drippers / Adjustable Dripper Stakes / Bubblers: 25 PSI Pot Stakes:
25 PSI Micro Sprinklers: 50 PSI
Drippers: 5 PSI
Adjustable Drippers / Adjustable Dripper Stakes / Bubblers: 5 PSI
Pot Stakes: 5 PSI Micro Sprinklers: 15 PSI
Drippers with Micro Sprinklers: 25 PSI
Drippers with Micro Sprinklers: 15 PSI


 Model #20LB03")
 12 Sq. Ft")